The BIOS update process is risky and improper operation may cause the device to fail to boot. Please ensure:
Do not power off or restart the device during the update process
Reconfirm your device model and BIOS version (if you are unsure, please contact the salesperson)
Back up all important data before proceeding
Notes and FAQs
Confirm that the downloaded BIOS file exactly matches the device model. Incorrect BIOS files may damage the device.
If you cannot enter the boot menu, try disabling the “Quick Boot” option in the BIOS settings.
In the EFI Shell, use the “map” command to view all available partitions. If the update process is stuck for more than 5 minutes, force a restart and try again.
After the update is completed, the first boot time may be longer, which is normal.
It is recommended to record the original BIOS version number before updating the BIOS so that you can roll back if necessary.
If you encounter the “Security Verification Failed” error, check the integrity of the BIOS file.
Things to prepare
A Blank USB Device
Capacity at least 8GB.
Windows Computer
Used to create a USB boot disk.
Required Documents
Rufus tool and BIOS files.
Peripheral Devices
Wired USB keyboard and monitor.
1. Make a FreeDOS bootable USB disk
Use Rufus to create a FreeDOS bootable disk:
Download and run Rufus on a Windows computer
Insert a blank USB drive and select it in Rufus
Select the boot type: FreeDOS
Select the partition scheme: GPT
Select the target system: UEFI (not CSM)
Click “Start” and confirm the warning prompt
Wait for the creation to complete (about 2-5 minutes)
2. Copy the BIOS update file
Copy the BIOS update file to the root directory of the USB drive:
Download the BIOS update package corresponding to your device model
Unzip the file and find the EFI and BIOS folders
Copy these two folders to the root directory of the USB drive
3. Boot the device to enter FreeDOS
Start the device and enter the FreeDOS environment:
Connect the USB drive, keyboard and monitor to the BKHD device
Connect the power and turn on the computer
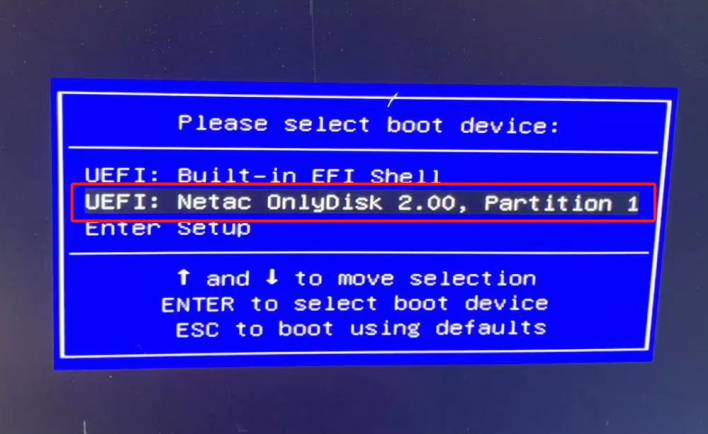
Quickly press the “F11 key” to enter the boot menu when booting
Select the “UEFI USB” boot item
4. Enter the EFI Shell environment
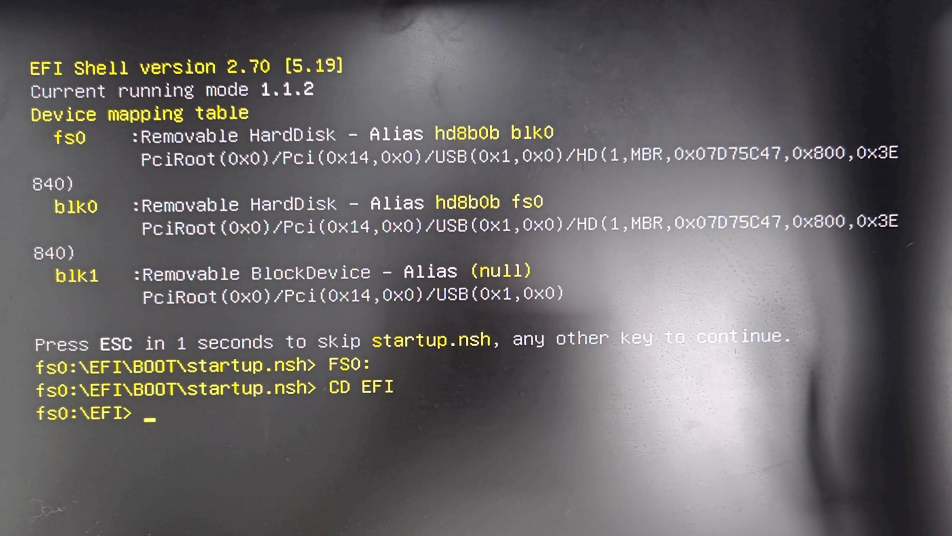
The device will enter the EFI Shell command line interface:
At this time you will see a command prompt similar to Shell>
5. Locate and perform a BIOS update
Execute the following command in the EFI Shell:
Shell> fs0: // Try to enter the first partition fs0:\> ls // View catalog contents
// If the BIOS folder is not found, try another partition fs0:\> fs1: // Switch to the second partition fs1:\> ls // View again
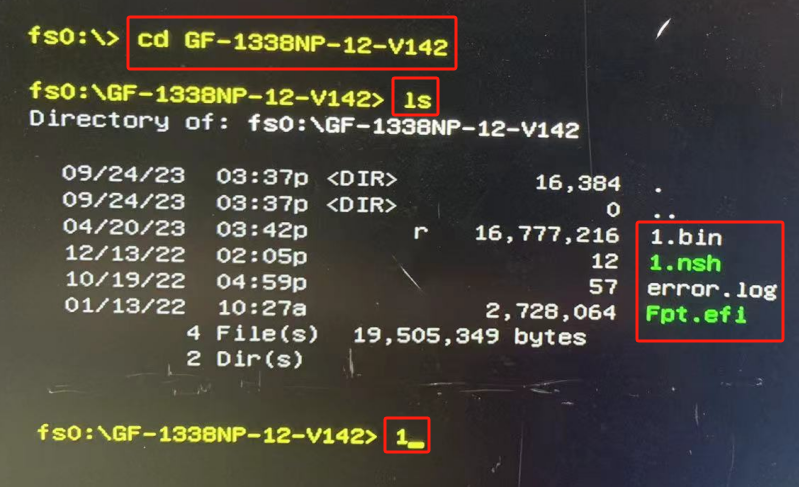
// Find the BIOS folder and enter fs1:\> cd BIOS // Enter the BIOS directory fs1:\BIOS> ls // View BIOS files
// Execute the update program (according to the actual file name) fs1:\BIOS> 1 // Enter 1 and press Enter to start the update
Notice:The partition numbers of different devices may be different. Please try one by one until you find the BIOS folder.
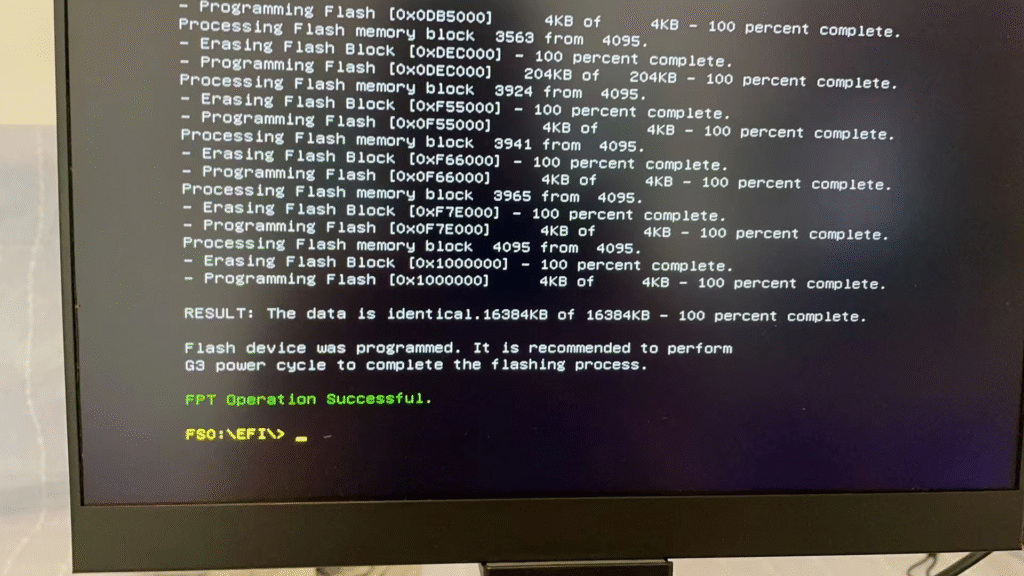
6. Complete the update and restart
The update process usually takes 1-3 minutes.
Do not perform any operations during this time.
When you see “Update Successful” or similar prompts, press “Ctrl”+”Alt”+”Delete” to restart the device.
Tip: After restarting, enter the BIOS setup, load the default settings and save them, and check whether the update is successful. You can confirm this by the BIOS version and update date.